Manual 203-Kawasaki vn 900 Custom-vn 900 Classic - Motorcycle Seats-Granucci Seats

Cerca
Vai ai contenuti

Menu principale:

Manual 203-Kawasaki vn 900 Custom-vn 900 Classic

ENGLISH

Seats for Kawasaki VN 900 Custom-VN 900 Classic
ASSEMBLING INSTRUCTIONS


(pict. 1) After having removed the original seat, remove the 2 screws on the mudguard which hold the lock block of the original saddles in place.

(pict. 2 and pict. 3) The block must be removed and put between the chassis’ tubes and the tank, you may also fasten it with a teflon clamp.

(pict. 4) The back mudguard of the VN 900 transversally rests on two connecting elements of the chassis, each of which already has a central hole (C and D) on the metal which is however closed by the plastic mudguard.

The long seat and the single seat are to be assembled by fitting the front bracket to the tank (in the same place as the original seat) and the small back bracket protruding from the seat with the nut and bolt supplied with them.


So, the only thing that you have to do before installing our long seat or solo seat is to drill a hole in the mudguard in correspondence with point C.

Only for pillion to drill a hole in correspondence with point D

There are two ways to locate point C.

First method to locate point C
Cut out the following cutting template:


(pict. 5) now rest it on the back mudguard so that the points A and B coincide with the holes of the two screws which held the lock block in place.
Point C is the drilling point, use a drill with a Ø 6 bit (better to use a smaller one at first).


Second method to locate point C
To locate point C instead of using the template you may use a small punch and from beneath (point C) pierce the plastic mudguard, slowly, until you puncture through it.
Before piercing, make sure that it is in the exact position!
.

(pict. 6) To assemble the rear seat, first fasten the front by overlapping its bracket to the bracket of the pilot’s seat and than fasten the back by fixing it to point D beneath the mudguard.

To find point D where to perforate the mudguard, you can use a small punch here too and pierce the plastic mudguard in the central hole D of the second metal connecting elements of the chassis.

ITALIANO


sella Kawasaki VN 900 Custom Vn 900 Classic
ISTRUZIONI DI MONTAGGIO

(foto 1) Dopo aver rimosso la sella originale,sul parafango svitate le 2 viti che fissano il blocchetto della serratura della sella originale

(foto 2 e foto 3) Il blocchetto deve essere rimosso e posto tra i tubi del telaio sotto il serbatoio,potete anche bloccarlo con una fascetta in teflon.

(foto 4) Il parafango posteriore della VN 900 appoggia trasversalmente su due fasce del telaio, ognuna di esse ha già sul metallo un foro centrale (C e D) che è però chiuso dal parafango in plastica.

La sella lunga e la sella singola si montano calzando anteriormente la staffa sotto il serbatoio (stessa sede della sella originale) e posteriormente fissando la piccola staffa sporgente dalla sella con il bullone e con il dado dati in dotazione.
L’unica cosa che dovete fare quindi prima di montare la nostra sella é dunque forare il parafango in corrispondenza del punto C.


Per aiutarvi ad individuare il punto C potete utilizzare 2 metodi.

Primo metodo di individuazione del punto C:

Ritagliare la dima di taglio:


(foto 5) ore appoggiatela sul parafango posteriore facendo in modo da far coincidere i 2 punti A e B nei fori delle 2 viti che prima fissavano il blocco della serratura.
Il punto C è il punto di foratura,usate un trapano con una punta diametro 6 (meglio usare prima una punta più piccola).


Secondo metodo di individuazione del punto C:
Per individuare il punto C al posto della dima potete anche usare un piccolo punteruolo e dal sotto (punto C) incidere il parafango che è in plastica,lentamente fino ad emergere in superficie..

Prima di forare accertatevi che il punto sia  quello giusto!
.

(foto 6) Per montare il sellino posteriore,esso va fissato anteriormente sovrapponendo la sua staffa con la staffa della sella pilota e posteriormente bloccandolo da sotto il parafango nel punto D.

Per trovare il punto D dove forare il parafango,potete anche qui  usare un piccolo punteruolo e incidere il parafango che è in plastica,nel foro centrale D della seconda fascia in metallo del telaio
.


DEUTSCH

Sitzbänke KAWASAKI VN 900 Custom-VN 900 Classic
ANWEISUNGEN ZUR SATTELMONTAGE

(Bild 1) : Nachdem Sie den Originalsattel entfernt haben, drehen Sie die beiden Schrauben aus, womit das Schlossgehäuse vom Originalsattel am Kotflügel festgemacht wird.

(Bild 2 u. 3) : Sie sollen das Schlossgehäuse wegnehmen und dasselbe zwischen Chassis und Tank positionieren; das Schlossgehäuse kann ev. mittels einer Teflonschelle befestigt werden.

(Bild 4) : Der hintere Kotflügel vom VN 900 wird auf zwei Haltebügel am Chassis quer gelegt, die eine Bohrung je am Metall im Mittelpunkt schon haben (C u. D). Solche Bohrung wird aber durch den Kunststoffkotflügel bedeckt.

Der lange Sattel sowie der Einzelsattel werden wie folgt angebaut: bringen Sie den Vorderbügel am Tank an (am Sitz vom Originalsattel) und machen Sie den kleinen vom Sattel hinausragenden Bügel durch die mitgelieferte Schraube und Mutter fest.


Vorm Anbau von unseren langen sowie Einzelsätteln sollen Sie also nur eine Bohrung am Kotflügel, und zwar am Punkt C machen.


Nur zum Anbau vom Beifahrersattel sollen Sie eine Bohrung am Punkt D Machen
.

Es gibt zwei Möglichkeiten, den Punkt C aufzufinden.

Erstes Verfahren zur Bestimmung vom Punkt C :
Schneiden Sie folgende Schnittschablone aus:


(Bild 5) : jetzt legen Sie die Schablone auf den Hinterkotflügel in der Weise, dass die Punkte A und B mit den Bohrungen der Schrauben zusammenfallen, wodurch das Schlossgehäuse befestigt war.
Punkt C stellt die Bohrungsstelle dar: benutzen sie einen 6 mm
Æ Bohrer (noch besser: zuerst benutzen Sie einen kleineren Bohrer).

Zweites Verfahren zur Bestimmung vom Punkt C :

Anstatt einer Schablone können Sie einen kleinen Treiber verwenden: bohren Sie den Kunststoffkotflügel von der Unterseite (Punkt C) ganz langsam bis zur Oberfläche.

Vorm Bohren vergewissern Sie sich, dass es sich um die richtige Stelle handelt!

(Bild 6) : Der Hintersattel wird wie folgt angebaut und fest gemacht: auf der Vorderseite soll dessen Bügel dem Vordersattelbügel überlappt werden; auf der Hinterseite soll er am Punkt D unter dem Kotflügel befestigt werden.

Sie können die genaue Stelle auch durch einen kleinen Treiber bestimmen, wo der Kotflügel durchgebohrt werden soll (Punkt D): bohren Sie den Kunststoffkotflügel durch die Mittelbohrung D vom zweiten Metall-Haltebügel am Chassis.

Den Sattel immer sorgfältig und achtsam überziehen und während der Montage Stöße oder Scheuern am Tank und am Motorradrahmen vermeiden.
Außerdem nicht vergessen, dass Schrauben und Bolzen und alle Befestigungssysteme des Sattels regelmäßig kontrolliert werden müssen, da sie sich wegen der Vibrationen lockern könnten.


FRANÇAIS

selle Kawasaki VN 900 Custom et Classic
INSTRUCTIONS DE MONTAGE


(photo 1) Après avoir enlevé la selle originale, sur le garde-boue dévissez les 2 vis qui fixent le bloc de la serrure de la selle originale

(photo 2 et photo 3) Le bloc doit être enlevé et placé entre les tubes du châssis sous le réservoir, vous pouvez aussi le bloquer avec un collier en teflon.

(photo 4) Le garde-boue arrière de la VN 900 s’appuie transversalement sur deux bandes latérales dont chacune possède déjà sur le métal un trou central  (C et D) qui est toutefois fermé par le garde-boue en plastique.

La selle longue et la selle individuelle se montent en emboîtant à l’avant la patte sous le réservoir (même logement que pour la selle originale) et à l’arrière en fixant la petite patte dépassant de la selle avec le boulon et l'écrou fournis.  
La seule chose qui vous devrez faire est donc, avant de monter notre selle, de perforer le garde-boue au niveau du point C.


Pour vous aider à identifier le point C vous pouvez utiliser 2 méthodes.
Première méthode d’identification du point C :
Découper le gabarit de coupe ont joint


(photo 5) maintenant posez le sur le garde-boue arrière en faisant coïncider les 2 points A et B dans les trous des 2 vis qui fixaient auparavant le bloc de la serrure.
Le point C est le point de perforation, utilisez une perceuse avec une pointe de diamètre 6 (mieux vaut d’abord utiliser une pointe plus petite).


Deuxième méthode d’identification du point C:
Pour identifier le point C à la place du gabarit vous pouvez aussi utiliser un petit pointeau et en passant par en dessous (point C) perforer le garde-boue qui est en plastique, lentement jusqu’à arriver à la surface.

Avant de perforer assurez-vous qu’il s'agit bien du point désiré !
.

(photo 6) Pour monter la petite selle arrière, il faut la fixer à l’avant en superposant sa patte avec la patte de la selle pilote et à l’arrière en la bloquant en passant par dessous le garde-boue au point D.

Pour trouver le point D sur lequel il faut perforer le garde-boue, vous pouvez ici aussi utiliser un petit pointeau et trouer le garde-boue en plastique, dans le trou central D de la deuxième bande en métal du châssis.

ESPANOL

asiento Kawasaki VN 900 Custom-VN 900 Classic
INSTRUCCIONES DE MONTAJE
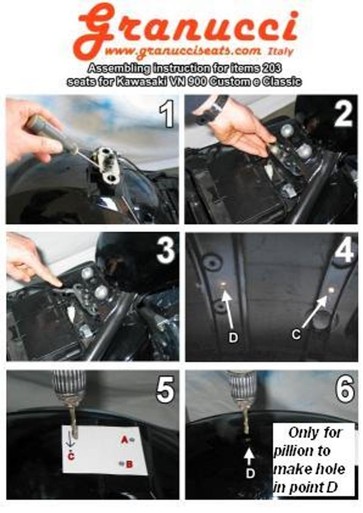
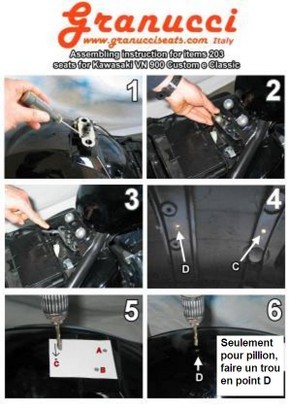
(foto 1) Después que Ustedes han quitado el asiento original, tiene que destornillar los dos tornillos del guardaborros que fijan el bloquito del cierre del asiento original.

(foto 2 y foto 3) El bloquito tiene que ser quitado y puesto entre los tubos del bastidor, bajo el tanque. Ustedes pueden también bloquearlo con una envoltura de teflón.

(foto 4) El guardaborros trasero de VN 900 se apoya de manera transversal a las dos envolturas del bastidor, cada una tiene ya un agjuero central en la parte de metal (C y D) que está cerrado por el guardaborros de plástico.

El asiento largo y el asiento síngulo se montan, poniendo en la parte trasera la abrazadera bajo el tanque (mismo sitio del asiento original) y fijando, en la parte trasera, la abrazadera pequeña que sobresale del asiento con una clavija y un dado que se le suministramos.
Luego, la única cosa que Ustedes deben hacer, antes que monten nuestro asiento, es barrenar el guardaborros cerca del punto C.


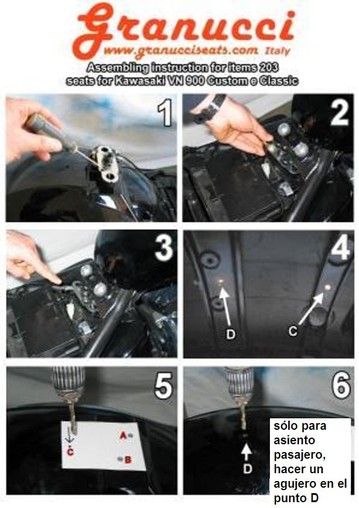
Para ayudarles a identificar el punto C, pueden usar 2 maneras.


Primera manera para identificar el punto C
Cortar la siguiente sagoma de corte:


(foto 5) Ahora tienen que ponerla sobre el guardaborros trasero de manera que los dos puntos A y B coincidan con los agujeros de los 2 tornillos que antes fiajaban el bloque del cierre.
El punto C es el punto de perforación, Ustedes deben usar un trépano con un talandro de diámetro 6 (es mejor utilizar antes un talandro con un tamaño menor).


Segunda manera de identificación del punto C

Para identificar el punto C, en vez que la sagoma, pueden usar un pequeño punzón y abajo (punto C) incidir el guardaborros de plástico sin prisa hasta que este surge a la superficie.

Antes que Ustedes perforen, tienen que estar seguros que el punto es correcto.

(foto 6) Para montar el asientito trasero, que tiene que ser fijado por delante, deben superposicionar su gancho con el gancho del asiento guía y de manera trasera deben bloquear el mismo abajo el guardaborros, en el punto D.

Para hallar el punto D donde Ustedes deben perforar el guardaborros, pueden utilizar también un punzón pequeño e incidir el guardaborros de plástico en el agujero central D de la segunda cinta de metal del bastidor.

 
Copyright 2016. All rights reserved.
Torna ai contenuti | Torna al menu