Manual 230-Honda Black Widow vt 750 - Motorcycle Seats-Granucci Seats

Cerca
Vai ai contenuti

Menu principale:

Manual 230-Honda Black Widow vt 750

ITALIANO


sella Honda VT 750 Black Widow
Istruzioni per il montaggio sella modello Solo and pillion

Innanzitutto rimuovete la sella originale, adesso rimuovete il supporto centrale A sul quale è montata la cinghia della sella originale.
Calzate la sella anteriore e praticate un foro di 11/12 mm. di diametro sul parafango nel punto B; questo punto è facilmente riconoscibile in quanto coincide con il segno della stampata del parafango e deve naturalmente coincidere con l’asola dell’attacco posteriore della sella pilota.
Dopo aver fatto il foro calzate nuovamente e definitivamente la sella anteriore,infilandola prima davanti e fissandola posteriormente nel punto B con il kit fornito.
Quando volete potete montare anche il sellino posteriore che ha ben due fissaggi: quello posteriore si blocca nel supporto originale a forma di fungo (punto C),facendolo scivolare prima indietro e poi in avanti fino al bloccaggio e quello anteriore con la piastrina che si blocca anch’essa nel punto B (va a sovrapporsi all’asola posteriore della sella pilota).
Attenzione: evitate di urtare contro i profili cromati taglienti della moto ogni volta che installate o rimuovete la nostra sella,potete anche applicare provvisoriamente con lo scotch  un cartoncino sul bordo del profilo cromato(il punto è  indicato dalla freccia), da rimuovere una volta montata la sella


Granucci seats

ENGLISH
 
                                                        
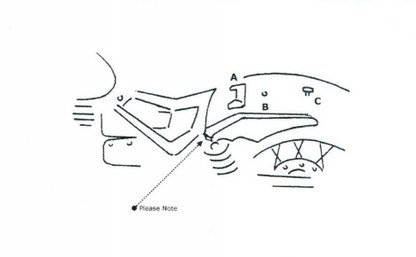
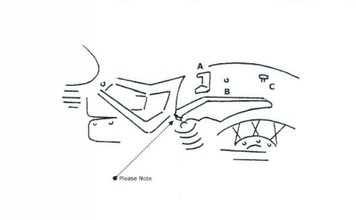
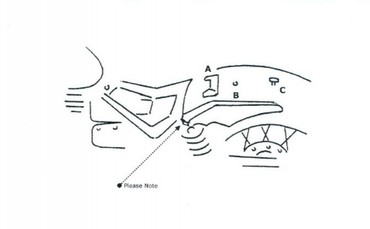
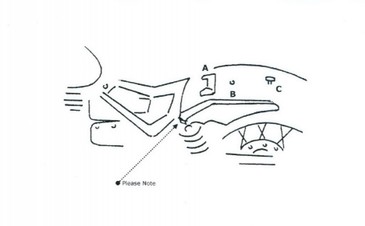
ASSEMBLING INSTRUCTIONS SEAT FOR HONDA VT 750 SPIRIT/ BLACK WIDOW

Granucci seats are made with care and using the best materials.The cover is in synthetic bi-elastic fabric.The sewing is non-degradable nylon.The structure is strong.
 
To ensure an ideal maintenance of the seat we suggest you to carefully read the following instructions:
 
1)       Assembling: always fit the seat carefully avoiding scratches and bumping  on the frame.
 
2)       Fit the saddle firmly  so that the front part does not lay on the tank.
 
3)       Washing: For washing and cleaning the seat it is advisable to use a sponge with water and mild soap. Avoid solvents and other aggressive detergents. Avoid washing the seat with high-pressured water.


LONG SEAT
1.       First remove the genuine saddle, then remove the central support A on which the handle (belt) of the original saddle is mounted.
 
2.        Make a hole of Æ11 or 12 mm. on the mudguard on B spot; this spot is easily recognizable as it is located on the mudguard printing.
Please carefully verify that the hole made coincides with the bolt located on the lower base of the saddle on long seats.
 
3.       Now carefully place our seat starting from the front part of it, then gently slide the seat backwards so that the back junction under the seat coincides with the original bolt  (C).
 
4.       Put your hand on the back part  of the seat and push forward until it gets locked.
To firmly lock the seat screw the bolt (included in the equipment) in the nut placed under our seat from under the mudguard through the 11/12 mm Æ hole made earlier.
                                                      
 
SOLO DRIVER SEAT + PILLION PASSENGER SEAT  
 
1. First remove the genuine saddle, then remove the central support A on which the handle (belt) of the original saddle is mounted.
2. Make a hole of Æ 11 or 12 mm. on the mudguard on B spot; this spot is easily recognizable as it is located on the mudguard printing. Please carefully verify that the hole made coincides with the hole of the back plate of the pilot’s seat..
3.Now carefully place our Single seat starting from the front part does not lay on the tank and put the back part in the hole B with a nut and bolt (included in the equipment).
 
       To fit the pillion then gently slide it backwards so that the back junction under it coincides with the original bolt (C) now put the front junction of the pillion on the pilot seat back junction (B)


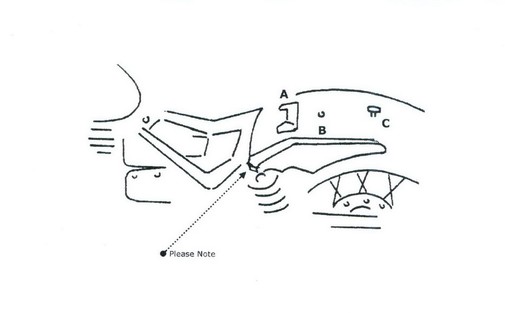
Please Note: each time you place or remove our seats avoid bumping into the chromium-plated profiles. To avoid damages please look at  the drawing. You can apply protection cards before working on the seat.
Granucci seats
DEUTSCH

Sitzbänke Honda Black widow vt 750
ANWEISUNGEN ZUR SATTELMONTAGE

ANWEISUNGEN ZUR SATTELMONTAGE FÜR HONDA VT 750 BLACK WIDOW

1. Nach Entfernen des Originalsattels die mittlere Halterung (in der Zeichnung mit Punkt A bezeichnet) entfernen.
2. Auf dem Schutzblech an Punkt B eine Bohrung mit dem Durchmesser 12 mm anbringen. Sorgfältig kontrollieren, ob die gemachte Bohrung mit dem in der Mitte des Sattelfußes angebrachten Schraubenbolzen übereinstimmt.
3. Die mittlere Schraube unseres Sattels lockern und unseren Sattel anbringen, indem er zuerst vorne übergezogen wird. Danach leicht mit der Hand das Sattelhinterteil nach unten drücken, ihn zuerst nach hinten und dann nach vorne gleiten lassen, bis unsere Kupplung in der Originalhalterung (in der Zeichnung mit Punkt C bezeichnet) blockiert wird. ***
4. Zur endgültigen Befestigung des Sattels das Schutzblech von unten mit der vorher aus dem unter dem Sattel angebrachten Schraubenbolzen herausgezogenen Schraube wieder anschrauben und zwar durch die vorher in der Mitte angebrachte 12-mm-Bohrung.

***Achtung: vermeiden Sie gegen die scharfen Chromprofile des Motorrads zu stoßen, wenn sie Ihren Sattel montieren oder entfernen, der Punkt wird durch den Pfeil angezeigt (Please note)
Sie können auch provisorisch mit Tesafilm ein Stückchen Karton auf den Rand des Chromprofils kleben und es nach Anbringen des Sattels wieder entfernen.


Außerdem nicht vergessen, dass Schrauben und Bolzen und alle Befestigungssysteme des Sattels regelmäßig kontrolliert werden müssen, da sie sich wegen der Vibrationen lockern könnten.

Granucci seats


FRANÇAIS

Selle Honda VT 750 Spirit-Black Widow
INSTRUCTIONS DE MONTAGE

D’abord, enlevez la selle originale, depuis enlevez le support de garde-boue arrière  A où la courroie de la selle originale est montée.
Perforer le garde-boue (un trou de Æ
11 or 12 mm) sur B; Vérifiez la correspondance du trou avec le boulon situé sur la base inférieure   des selles longues.
Maintenant, placez notre selle avec attention enfilez-la d’abord devant, de sorte que l’étrier sous la selle s’introduise sous le réservoir.
Bloquer la parte derrière de la selle de sorte que l’étrier se bloque in correspondance avec le boulon original (C)
En passant dessous le garde-boue fixez la selle avec le boulon
situé sur   la base inférieure   de la selle (voir point 2 des instructions)                                                       


INSTRUCTIONS DE MONTAGE POUR SELLE PILOTE + PILLION SEAT POUR HONDA VT 750 SPIRIT/ BLACK WIDOW  

D’abord, enlevez la selle originale, depuis enlevez le support de   garde-boue arrière   A où la courroie de la selle originale est montée.
Perforer le garde-boue (un trou de Æ11 or 12 mm) sur B; de la selle pilote
Maintenant, placez notre selle pilote avec attention enfilez-la d’abord devant, elle ne doit pas avoir contacte avec le réservoir et placez la parte postérieure dans le trou B avec le boulon et l’écrou fournis.
Pour mettre la selle passager fixer les jointures de la selle passager au points C et B.


N.B. Rappelez-vous toujours d’enfiler la selle avec soin et attention, évitant lors du montage tout choc ou friction contre le réservoir et le châssis de la moto. N’oubliez pas en outre d’inspecter périodiquement les boulons et tous les systèmes de fixation de la selle, qui pourraient se desserrer à cause des vibrations

Granucci seats

ESPAÑOL

Asiento Honda VT 750 Spirit-Black Widow

INSTRUCCIONES DE MONTAJE
ASIENTO LARGA SPIRIT- BLACK WIDOW230HB,230FA,230 FAPI

1. En primer lugar extraer el asiento genuino, entonces eliminar el soporte central A en la que está montado el mango (cinturón) de la montura original.
2. Hacer un agujero de 11 o 12 mm. en el guardabarros en mancha B; este lugar es fácilmente reconocible, ya que se encuentra en la impresión guardabarros. Por favor cuidadosamente verificar que el agujero hecho coincide con el perno situado en la base inferior de la silla de montar en los asientos largos.
3. Ahora se coloca cuidadosamente nuestro asiento a partir de la parte frontal de la misma, luego suavemente deslizar el asiento hacia atrás de manera que la unión de nuevo bajo el asiento coincide con el perno original (C).
4. Pon tu mano en la parte posterior del asiento y empuje hacia delante hasta que se bloquea. Para bloquear firmemente el tornillo de asiento del tornillo (incluido en el equipo) en la tuerca colocada bajo nuestro asiento de debajo del guardabarros mm a través de la 11/12 agujero  anteriores

Instrucciones para el uso de nuestro modelo individual + asiento pasajero

5. primero quitar el asiento original, ahora quitar el soporte central A en la que está montada la correa del asiento original.
6. llevado el asiento delantero y perfore un agujero de 11/12 mm. de diámetro en el guardabarros en el punto B, este punto es fácilmente reconocible, ya que coincide con la señal de la versión impresa del guardabarros y debe, por supuesto, coinciden con la ranura de la parte posterior del asiento del conductor.
7. Después de que el agujero usados de nuevo y finalmente el asiento delantero, primero la inserción de la parte delantera y trasera mirando en el punto B con el kit suministrado.
8. Cuando lo desea, también puede montar el asiento trasero tiene dos fijaciones: choques traseros en el soporte original en forma de hongo (punto C), en primer lugar, deslice hacia atrás y luego hacia adelante a la cerradura y la parte delantera de la placa que también se detiene en el punto B (va a solapar la ranura trasera del asiento del piloto).


Please Note: cada vez que usted coloque o quite nuestro asiento evitar chocar con los perfiles cromados. Para evitar daños por favor estudie el dibujo. Usted puede solicitar tarjetas de protección antes de trabajar en el asiento.

Granucci seats

 
Copyright 2016. All rights reserved.
Torna ai contenuti | Torna al menu